So, when we initially bought Alice, we camped in it once. Once, too many times to decide that the ugly, uncomfortable Jack Knife couch had to go!
We drew straws as to who would sleep at the end as you basically had to sleep with one hand on the floor for fear of rolling off. Did I say this couch was uncomfortable? Not to mention ugly.
Jack knife couch at end of trailer.
Jack knife couch folded down.
I thought I might be able to get away with an IKEA extending daybed (Hemnes Daybed), but my RV setup would not allow it. I have the furnace and holding tank there. So, I have to build around it.
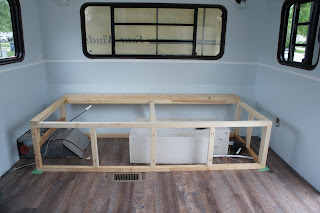
I used all 2x2 and 2x3 boards with pocket holes. Again, as stated in previous blogs, get a KREG JIG!
Size of Daybed:
I spent some time googling sizes, heights, widths of day beds. And basically it comes down to this...I had to make it fit the front of the trailer. Period.
Next you want to decide how much room you want to sleep on.
Well I have about 52" from front of trailer to exterior door.
So, I decided on an IKEA full mattress. It is 53". Which means when we make down the bed it will stick out a couple of inches. Which is fine.
As for the height, the mattress is almost 5" (4 3/4") So, most average couches are no higher than 22".
So, I built the base according, and this will give me plenty of clearance for my furnace and holding tank.
So, I have a 75" x 54" x 5" to play with.
Well I was putting this together, and got the base in place, I was thinking, wow, this is wide already, and of course my mind starts racing at night, cant sleep ( I do this all the time, as previous posts, my mind is my own demise) I then had an epiphany! I can't make it any narrower, the stupid holding tank is there! Doh! Silly LouLou.
So there are a couple of options for making the daybed, I wanted to be able to get underneath so I am making it extended plus I can lift it as well.
So, basically, you start with your nice "picket fence". What I did was cut enough to get the right spacing between each slat.
Then I glued and nailed every SECOND board, with an nail gun.
( I would then flip it over)
You then end of with this:
Why
I stapled it first? because it was the only way I could keep the pieces
together, so I could glue and screw the slats to the rail.
So this was the stationary piece, it is not going to slide, so I was able to do both rails, top and bottom.
Now I want to do the same thing but for the sliding portion of the bed.
So, I lay my pieces down and space them evenly apart.
Again, glued and nail every second board.
Notice the overhang? This is because those pieces will be screwed into a 2x2 that will serve as the side rail.
You then end up with this:
Again, you then flip it over and glue and screw the boards.
You have to leave the one end open to interleave the rails together.
At this point, the one side is done. Well almost... Still need to apply a hing and connect the rail.
Note: You will need to sand the end pieces that slide over the 2x3 rail and apply candle wax, as this is a snug fit.
I then added the bead board to the frame.
(sand the shine off of the bead board before you prime and paint)
 |
| You can see how you "intertwine" the pieces together. |
Next to add the support brackets for the extension.
This was done with 2" x 2"'s and a 2" x 3" front. Then the extending slide slats are glued and screwed to this.
I was originally going to make just one big extension. But, having the two makes it much easier to slide in and out.
The
only thing I am not sure about is the spacing of the slats. I went with
1" x 3", but I am thinking I should have gone with 1"x 2"'s. I will see
when I put the mattress on. At that point I may have to cut some 1/4"
panels and lay they on top.
 |
| Gives me access to the furnace and holding tank. |
So for the most part I am done the bed. I will need to make a cupboard on each end, but for the most part we can sleep now...
My apologizes it has been over a year without an update, but actually taking time to use the trailer like this gave me a better perspective on what to do with it.
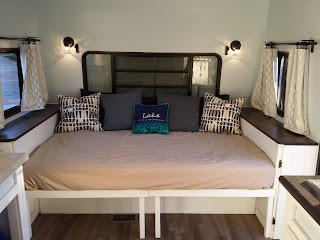
We definitely needed a head board. So I went with storage on both sides.
I built it so I can access it from the top and from the side.
The one closes to the door opened inwards so I can put chairs from the outside.
Both turned out great!
The tops were done with pine and stained with Tea and steelwool/vinegar. Very easy to do and you cant mess it up.


This is AMAZING! Do you think it is strong enough to hold larger people (Americans - we supersize everything!)? Like 450 combined pounds?
ReplyDeleteThank you so much for posting all your progress.We recently bought a travel trailer and I will be doing all the renovations. This is extremely helpful.
ReplyDeleteI love the pull out slats for extending the bed, but I also really enjoy that you did a simple lift (more budget friendly) instead of the hydro lift! Thanks for sharing - I'll be using this build :)
ReplyDeleteI see you built it for a specific mattress, but do you ever "close" the slats? If so, where do you put the mattress? We have a similar situation, but we want a sofa during the day, and a pull out bed at night. Have considered two slim foam mattresses, even thought about a full air mattress. Lots of choices in a reno.
ReplyDeleteThis is really really useful, thanks a lot for posting!
ReplyDelete