So, I am not going to lie to you that this was one of the easier things to do. I think for the most part I created my own demise. I stewed on things way too much, and it turned out to be at least a 3 week process. (Basically, after work, and a couple of weekends) But, really, what caused me all the pain, is that I wanted to paint the inside as well, so, I was always thinking ahead, and figuring out how to anchor shelves, what needs to be painted first, what needs to be secure first, on and on...
Highlights:
- I used cheap lumber, I am on a budget, so to buy the better lumber for cabinets was not an option. (Still turned out great)
- Buy a KREG JIG! It is great for making pocket holes. You will find yourself using it for almost everything.
- I will also tell you the things I have done wrong, yes, everyone learns from those.
- Screw hole pop through counter top, be careful and go slow
- Buy Zinger 1-2-3 primer, before painting. I spent way too much money thinking I could short cut the painting aspect but doing a "Paint & Primer" in one. You end up applying more paint then if you primed it first.
- Always tape your laminate counter top before your cut it. It will not chip as much. ( I also bought a jig saw blade for counters, but had some issues trying to cut a straight line, so mostly used the circular saw. Only used the jig saw for corners. The Jig saw blade for laminate have the teeth in the down direction, instead of up.)
- Spray edge trimming for counter top after you ironed it on. It ruins the finish before hand.
So, what started with this:
Then to this, with the walls redone, but still old crappy cabinet:
(Just wanted to get the feel of what needs to be in place)
Kreg Jig:
First off, if you ever want to make cabinets, drawers, doors etc. BUY A KREG JIG!!!It is my new favorite toy! Love it! So easy to use, cant really screw it up, they are not that expensive.
But, here is the back side of the new cabinet:
(Please keep is mind, I am on a budget, so cheap lumber is what I used, but in the future I would use some decent straight edged lumber)
Stick Build Cabinet:
So I pondered about how to rebuild the cabinet. "Stick build" or buying a sheet a plywood and cutting the holes for the drawers etc. I went with the stick build as it is lighter weight, and I often change my mind on a lot of things, so doing this allows for leeway. |
| Pex plumbing in place for sink and outdoor shower |
 |
| With Sink installed |
 |
With Stove in place
I just put filler panels in the two bottom openings for now, I may put drawers later on. |
 |
| Cutting board adding, need to finish edging as well as water proof the bottom. |
- Back splash
- Exhaust hood
- Additional cupboards where filler panels are in place
- Figure out what to do with the SPACE behind the stove!
Pantry:
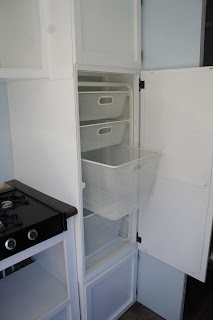
The original tall cabinet was a complete "PITA" it was too deep to get anything out of, and when I tried to remove it, it probably weighed a good 25-30lbs. It was HEAVY. Did I say what a PITA it was to remove it too!Anyway, I wanted to keep it light, so I went with the IKEA cart with pull out wire baskets. The whole unit fit perfectly, and I have baskets that I can pull.
 |
| May swap out a large basket for two smaller ones |
 |
| Finished cupboard with drawers |
Counter Top:
I was not going to use the ugly crap counter top that was originally in the trailer. Ugly!I was lucky to pick up a 10 foot piece at the Habitat for Humanity re-new store for $40. Good enough for me!
But, I had an issue with the edging. I needed to apply edging to door side.
Try finding edging to match! Well I did, but the company wanted almost the same price for 1" by 2' edging. Forget that.
I McGiver'd it.
Note: Paint it after you iron it on!
I had white edging from a previous project, so I applied it to the counter top, and then used a Krylon Brushed Metallic Bronze spray paint. It is not bang on, but so very close.
I originally, sprayed it before I ironed it on, but it ruins the finish, so spray it afterwards.
 |
| Over spay can be cleaned up with varsol |
Repair screw hole in laminate counter top:
Yep. I was over zealous in my counter top attachment, and next thing I know the screw popped through the counter. I was extremely upset over this.
My Kreg Jig should have prevented this, as the setup sets the depths of the holes so as to not go any further, but I think my drills torque was too high, and just kept on screwin'.
Will update when complete. Have not fixed it yet...


No comments:
Post a Comment